Ok so I know that including the word “need” in the title of this post seems a little extreme. But if you’re a paper crafter, then you know all crafting supplies are a NEED. LOL
I’ve always had this crafty calling, but recently I decided that I needed to focus more on handmade cards simply because they are:
1. Small projects I can easily complete with 3 kids running around yelling
2. Something I can share (although I admit I have a hard time sending them to people because I like looking at them myself…lol)
3. Stamps are some of the MOST adorable things out in the world today and I MUST have them all!
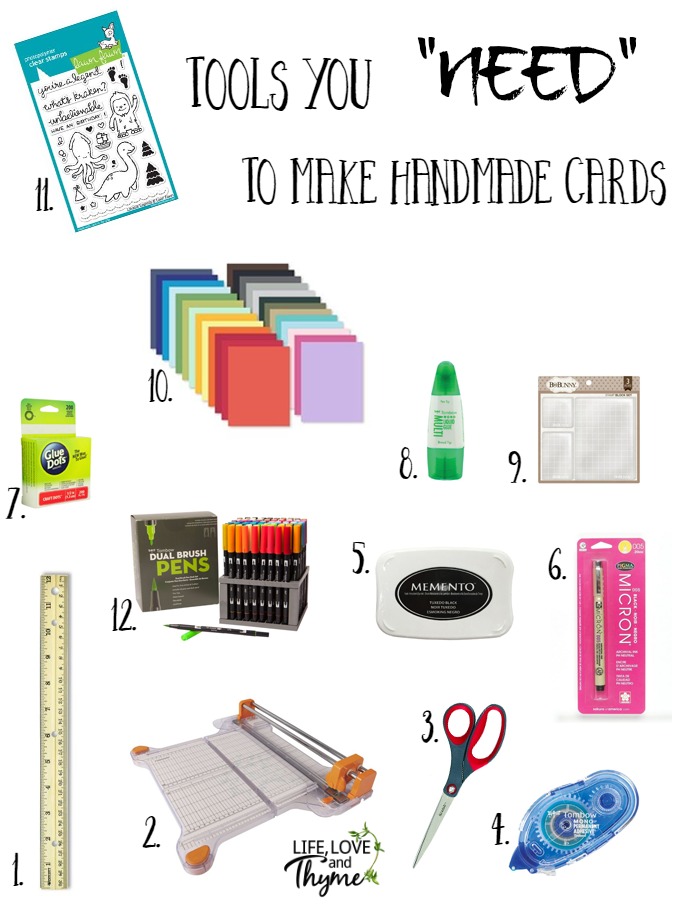
I had a hard time limiting this list (as you’ll see), but here are the tools I think you’ll NEED to get started making handmade cards.

Ok…so I know my version of “need” and your version of need may be a little different, but I honestly feel that with these basics, you’ll be able to make any card you need…and make it any color you want.
Also, I’m guessing you’re thinking “there’s only one stamp pad there and it’s black, how can I make pretty cards with just that color?”
Again…these are just the basics. But my goal here is to show you what I “should” have spent my money on when I first got started (instead of buying different colors of stamp pads…which are cool don’t get me wrong…but not necessary for the beginner!)
Tools for Handmade Cards
1. Ruler – Probably pretty obvious, but you need to know the sizes of your card stock when working with it. Most of my card bases are 4.25″ x 5.5″ which is the size of an 8.5″ x 11″ piece of card stock cut in half. But then for the layered pieces, you’ll want to measure them using your handy dandy ruler.
2. Paper Trimmer – Yes, there are smaller and less expensive paper trimmers out there, but TRUST me, most of them suck. They cut the paper crooked or leave crappy edges. Do yourself, and your sanity, a favor and get a good one right off the bat….unless of course you like cursing at inanimate objects, then get the cheap one.
3. Scissors – You can never have too many scissors!
4. Permanent Adhesive Tape – This makes it super easy to apply to the back of your card stock when putting together your cards. Be sure to have replacements on hand!
5. Memento Black Ink Pad – When gathering the basics for your handmade cards, I think you only need a good black ink pad. Then you just use markers to color in whatever color you want for the card you’re making. Now, once you get get started, you’ll want to add other colors (I like the StampinUp ink pads), but for now this will do everything you want.
6. Micron Pen – Sometimes you want to hand write a sentiment or make a fun hand drawn doodle on your card. Other times, you didn’t completely get the stamp all the way down and need to cover up the mistake. Either way…this pen is a must!
7. Glue Dots – Sometimes you need to glue down something small. These are easy and don’t make a mess.
8. Liquid Glue – You need glue for paper piecing. Notice I have three kinds here…and I’ll add a few more in my next post about card making.
9. Acrylic Block – Many of the stamps you can buy these days are clear cling stamps (as opposed to wood mounted). These are a little different for new card makers, but they are super easy to use and store. You just peel the stamp off the plastic and stick it on the acrylic block. This makes it MUCH easier to see where you’re placing your image.
10. Colored Card Stock – You’ll need all kinds of colors so this set is a good start.
10A. White Card Stock – It didn’t really show up in the main image so I didn’t include it, but you’ll need tons and tons of this. Be sure to stamp your images on the white card stock a few times (just in case you mess one up) and I use it for the background of most of my cards.
11. STAMPS – Ok so this one is a little obvious, but you’ll need stamps. There are some seriously cute stamps out there (it’s a dangerous rabbit hole to go down). The ones pictured are from Lawn Fawn and are such a fun set (click the word STAMPS to get a closer look). BUT…you don’t have to spend tons of money on stamps when you first get started. Look around for some digital stamps (Gerda Steiner is one of my favorites). You just print these out, then color them and cut them out.
12. Tombow Watercolor Markers – These markers are easy to use and you can color any image you want with them. Don’t worry about being perfect…the idea is for it to actually look handmade! Check out this post from one of my favorite stamp creators on using watercolor markers.
I know that was a LOT of stuff, but I’m betting you have some of it already.
There’s a LOT more stuff you will want to make your handmade cards (I didn’t put any embellishments in here are all! That’s whole post in it’s self!), but I think I’ll save that. I don’t want you to break the bank right off the bat! LOL
And if you’re like me and want to take a class to show you some of the basic techniques, check out 40 Techniques Every Stamper Should Know. That should get you off on the right foot!
What tools do you “need” for your paper crafting?


